
Updated 1/2026
Many new developers feel overwhelmed when starting with dynamic websites. They learn HTML and CSS, and some prefer using a visual editor for HTML and CSS to simplify the process, but then PHP and databases introduce a new layer of complexity. Managing information for a site seems like a task for advanced experts. This perception stops many promising projects before they even start.
A local server environment changes everything. It turns a personal computer into a powerful web development workstation. These setups allow for building and testing complex websites without an internet connection. They provide a safe space for experimentation where mistakes have no real-world cost.
A critical component of this setup is a database management tool. For MySQL and MariaDB databases, one program stands out for its simplicity and power. This tool is phpMyAdmin. It offers a visual interface to handle what would otherwise require complex command-line instructions.
Understanding these localhost tools phpmyadmin is a fundamental skill. It bridges the gap between writing code and managing the data that code relies on. This knowledge turns a beginner into a capable full-stack developer. It is the key to building modern, data-driven applications like blogs, stores, and social networks.
This guide explains how to set up and use these essential utilities. It will cover installation, daily operation, and troubleshooting common issues. The focus is on practical, actionable advice for developers at every level. To make this guide even more practical, a downloadable checklist is available at the end of the article to help you set up and secure localhost tools phpmyadmin step by step.
What is a local server and why is it needed
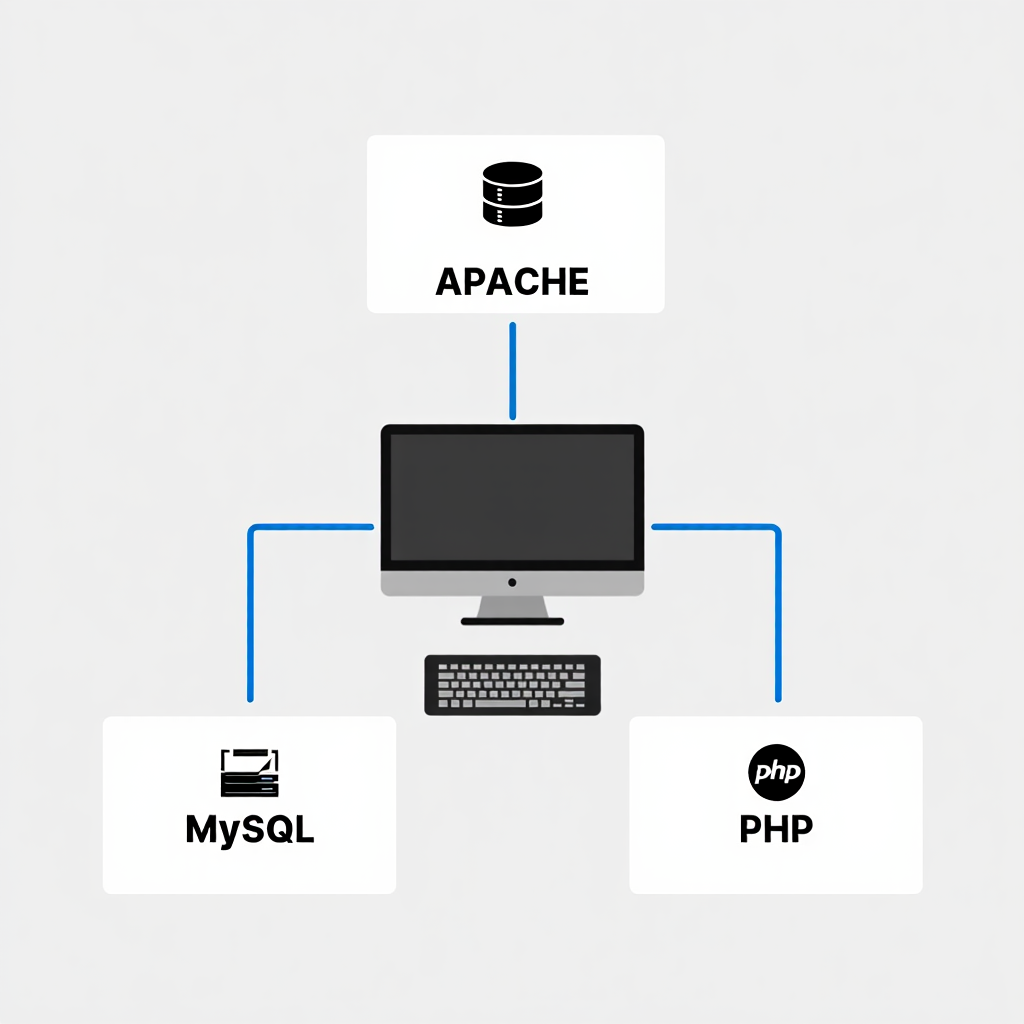
A local server is a software package installed on a personal computer. It replicates the environment of a live web hosting account. This system includes a web server like Apache, a processing language like PHP, and a database system like MySQL. Together, they let you run website files directly from your machine.
This setup is indispensable for modern development. It allows for instantaneous testing of code changes without uploading files to a remote host. Developers can experiment with new features, debug problems, and design entire websites offline. This process is faster, more secure, and completely private.
Using a local environment prevents embarrassing errors on a live site. You can test new plugins, themes, or custom code without risking a public failure. It also simplifies version control. Changes can be perfected locally before being pushed to the production server.
Several popular software bundles create this environment. Options like XAMPP, WAMP, and MAMP are widely used. They are free, open-source, and relatively easy to install. An older Windows-based option called Denwer also exists, though it is less common today.
The Core Components Explained
Every local server stack is built on the same core ideas. The web server software handles HTTP requests from your browser. The PHP interpreter processes server-side scripts to generate dynamic content. The database server stores and organizes all the structured information for your applications.
These components work together seamlessly. When you type localhost into your browser, it connects to the server on your own machine. Your PHP files execute, and they can retrieve data from the local MySQL installation. This creates a perfect simulation of a real web host.
Why Skip the Live Server?
Developing directly on a remote server is inefficient and risky. Every small change requires file transfer via FTP, which is slow. A mistake in your code could crash the live website, affecting real users. A local setup eliminates these problems entirely.
Working locally provides total freedom. You do not need an internet connection to write and test code. There are no storage limits or restrictions from a hosting provider. A 2023 study by McKinsey found that developers using efficient tools in local environments can complete tasks up to twice as fast, reducing project time significantly (2023, McKinsey & Company). This is the professional standard for efficient, safe web development.

Installing phpMyAdmin
PhpMyAdmin is usually included with major local server packages. Installing XAMPP or WAMP typically adds it automatically. It becomes accessible through the localhost dashboard once the Apache and MySQL services are running. This is the easiest way to get started.
Sometimes, you might need to install the tool separately. You can download the latest version directly from the phpMyAdmin website. The process involves extracting the files into your server’s htdocs directory. You then access it by navigating to localhost/phpmyadmin in your web browser.
After installation, the first step is securing the application. The default configuration often has no password for the root database user. This is a major security risk, even on a local machine. You should immediately set a strong password for the MySQL root account.
Rule: Always set a strong password for your local database's root user. A vulnerable local setup can be an entry point for malware if your network is compromised.
Configuration files control how the program behaves. The config.inc.php file contains important settings for connecting to your database server. For most users, the default settings work perfectly. Advanced users can customize appearance, language, and authentication methods here.
Additionally, enable HTTPS for your local phpMyAdmin instance using self-signed certificates to protect against potential network eavesdropping, even in a development environment. Regularly update phpMyAdmin to patch known vulnerabilities.
Completing the phpMyAdmin Localization Process
Many developers prefer software in their native language. The interface supports numerous translations. Changing the language is straightforward within the application’s settings. This phpmyadmin localization makes the tool more accessible for Russian-speaking users.
The localization process happens through the user interface. After logging in, you select the “Settings” tab. Then you choose the “Main panel” and find the “Language” option. Selecting “Russian” from the dropdown menu will immediately translate the interface, completing the phpmyadmin localization.
If the Russian language option is missing, you might need to download the language pack. This is rare with full packages like XAMPP. For manual installations, ensure the locale folder contains the ru directory with the necessary translation files. This finalizes the phpmyadmin localization.
A properly translated interface reduces errors. Understanding menu options and warning messages becomes much easier.
“Learning of a foreign language and culture is important. It helps you think and be a better person.” – Bjarne Stroustrup, the creator of C++, is a professor of computer science at Columbia University and is known as the “father” of C++.
Verifying Your Installation
A quick test confirms everything works correctly. Start your local server and ensure both Apache and MySQL are active. Open your browser and go to http://localhost/phpmyadmin. You should see the login screen for the application.
Log in using “root” as the username. Use the password you set during the MySQL configuration process. If the login is successful, you will see the main dashboard. This screen shows an overview of your database server and its status. Your installation of these localhost tools phpmyadmin is now complete.
To visualize the process of creating databases and tables in phpMyAdmin, watch this beginner tutorial that walks through the basics step by step.
Working with databases
The main dashboard provides a central hub for all database activities. The left sidebar lists all existing MySQL databases on the server. The central area offers server information and quick links for common tasks. This intuitive layout helps users navigate complex data structures.
Creating a new database is a fundamental first task. You type the database name into the creation field on the main page. You then select a collation, like utf8_general_ci, for character encoding. Clicking “Create” builds the new, empty database ready for tables.
Within a database, you store data in tables. Each table contains rows and columns, much like a spreadsheet. Creating a table requires defining its structure: the names of columns and the type of data each will hold. Common data types include INT for integers and VARCHAR for text.
After creating tables, you can populate them with data. The “Insert” tab allows for adding rows of information manually. For larger imports, the “Import” tab is incredibly useful. It can process structured data from SQL files or CSV files, quickly filling a table.
| Task | Navigation Path in phpMyAdmin | Key Consideration |
|---|---|---|
| Create Database | Homepage -> Database name field -> Create | Choose the correct collation for your language. |
| Create Table | Select DB -> Structure tab -> Define table | Set primary keys and auto-increment fields for IDs. |
| Insert Data | Select Table -> Insert tab | Fill in values for each defined column. |
| Run SQL Query | Select DB -> SQL tab | Write precise SELECT, UPDATE, or DELETE statements. |
| User Management | Homepage -> User accounts tab | Grant specific privileges to users for security. |
Executing SQL Queries
The SQL tab is a powerful feature for advanced control. It allows you to execute raw Structured Query Language commands. This is how professionals interact with databases directly. You can write a query to select, update, or delete specific records with precision.
For example, the query SELECT * FROM users WHERE city = 'Moscow' fetches all users from that city. This direct access is faster than clicking through menus for complex filters. A 2025 report by SAP Community highlighted that experienced developers can write SQL queries more quickly than navigating GUI, improving efficiency in complex tasks (2025, SAP Community). Learning basic SQL syntax greatly enhances your effectiveness with this localhost tools phpmyadmin.
Exporting and Backing Up Data
Regular backups are a critical habit. The “Export” function provides a simple way to safeguard your work. You can choose the custom export method for the most control. Selecting the SQL format creates a perfect snapshot of your entire database structure and content.
This backup file can be stored elsewhere on your computer. If your local server crashes or data gets corrupted, you can easily restore everything. Use the “Import” tab to execute the saved SQL file. It will rebuild your database exactly as it was during the export.
“A backup that fails to restore is no better than having no backup at all.” – Chris Dale, Senior Director of Product at Veeam Software, is a BCDR expert with 20+ years of IT experience.
Solving problems with virtual disks
Some older local server environments, like Denwer, used a virtual disk. This was a network drive that acted as the server’s root directory. It was convenient for organization but could cause issues on modern systems. Windows might try to reconnect this drive endlessly at startup.
This behavior can slow down a computer’s boot time. The operating system waits for the virtual drive to connect before proceeding. If the software is not running, this process causes a noticeable delay. This makes managing the virtual disk an important troubleshooting step.
The most effective solution is often to disable the virtual disk feature. This can usually be done from the control panel of the server software itself. For persistent problems, a deeper system modification might be necessary. This prevents the automatic reconnection attempt during startup.
In severe cases, the best course of action is a full removal. An incomplete Denwer uninstall can leave behind registry entries and scripts. These remnants continue to try and mount the non-existent drive. A thorough cleaning is required to stop these errors permanently.
Step-by-Step: How to Disable the Virtual Disk
- Run the Denwer Control Center.
- Stop all Denwer-related services.
- Open settings and disable automatic mounting.
- Reboot your computer.
- If needed, use Windows Disk Management or the subst command.
This process solves the issue to disable the virtual disk.
Performing a Complete Denwer Uninstall
Sometimes, troubleshooting is not worth the effort. A clean slate is the most reliable path to a stable system. A proper Denwer uninstall involves more than just deleting its folder. You must also remove its startup entries and environment variables.
First, use the program’s own stop script to halt all services. Then, you can delete the main Denwer installation directory. Next, check the Windows Startup folder for any remaining links. Remove any files related to the program that might execute on boot.
Finally, clean the Windows registry. A 2005 article in the Journal of Accountancy noted that incomplete uninstalls often leave files behind, contributing to system slowdowns (2005, American Institute of CPAs). Search for and delete any keys containing “denwer” or “websoft”. Always back up the registry before making any changes. This comprehensive process ensures a complete Denwer uninstall with no leftover components.
After removal, you can install a more modern local server tool like XAMPP. These newer packages typically avoid using virtual drives, preventing these issues entirely. This upgrade improves both system stability and development workflow.
Transitioning to modern alternatives like Docker or Laragon eliminates virtual disk issues entirely. These tools provide containerized environments that are more efficient and compatible with current operating systems, reducing setup time and potential conflicts.
Rule: When uninstalling any complex software, use a dedicated uninstaller tool or follow a verified guide to remove all registry entries and startup items, preventing future system conflicts.
Here’s a basic template for config.inc.php to get you started:
PHP
<?php
/* Servers configuration */
$i = 0;

/* Server: localhost [1] */
$i++;
$cfg['Servers'][$i]['verbose'] = 'Localhost';
$cfg['Servers'][$i]['host'] = 'localhost';
$cfg['Servers'][$i]['port'] = '';
$cfg['Servers'][$i]['socket'] = '';
$cfg['Servers'][$i]['connect_type'] = 'tcp';
$cfg['Servers'][$i]['extension'] = 'mysqli';
$cfg['Servers'][$i]['auth_type'] = 'cookie';
$cfg['Servers'][$i]['user'] = 'root';
$cfg['Servers'][$i]['password'] = ''; // Set your password here

/* End of servers configuration */

$cfg['blowfish_secret'] = 'your_secret_here'; // Replace with a strong secret
$cfg['DefaultLang'] = 'en';
$cfg['ServerDefault'] = 1;
$cfg['UploadDir'] = '';
$cfg['SaveDir'] = '';
?>
Customize the password and blowfish_secret for security.
Frequently Asked Questions
How do I connect to my local database from other software?
You can connect other applications, like a code editor or standalone GUI, to your local database. Use 127.0.0.1 or localhost as the database hostname. The username is often root, and you use the password you set. The database name is the one you created in phpMyAdmin. This allows external tools to interact with your MySQL server.
How can I integrate AI tools with phpMyAdmin for faster querying?
Use extensions like AI-assisted SQL generators in your IDE, which can connect to your local database via localhost. This speeds up query development by suggesting optimizations based on your data structure.
Why can’t I access localhost tools phpmyadmin after installation?
This common error usually means the web server is not running. Open your local server control panel, like XAMPP, and start the Apache module. Also, ensure the MySQL service is active. If the problem continues, check that you are using the correct URL, typically localhost/phpmyadmin. A firewall blocking the port is another possible cause.
What is the best alternative to a complex local server setup?
For those who find traditional stacks too complicated, newer options exist. Docker containers offer a lightweight and isolated environment. Another popular trend is using a dedicated development environment like Laragon. It is simpler to manage than Denwer and avoids the need to disable the virtual disk.
How do I move my local database to a live website?
The process involves exporting your database from the localhost tools phpmyadmin. Use the “Export” tab and choose the SQL format. On your live web host, access their phpMyAdmin or database manager. Create a new database and then use the “Import” tab to upload your SQL file. This transfers all your data perfectly.
Should I learn visual editors before setting up phpMyAdmin?
Yes, many beginners build confidence with static HTML/CSS using a visual editor for HTML and CSS. Once comfortable, moving to localhost tools like phpMyAdmin becomes a natural next step for handling dynamic data.
Rule: Before exporting a database for migration, always check for compatibility issues, such as different MySQL versions between your local server and your live hosting provider.
Before the conclusion, it’s useful to watch a hands-on video showing how to install and run localhost tools phpmyadmin so you can see the setup in action.
Conclusion
Mastering a local server and phpMyAdmin is a transformative skill for any web developer. It moves development from a public, risky endeavor to a private, controlled process. The ability to build and test a complete website offline is non-negotiable for professionals.
These localhost tools phpmyadmin provide the perfect gateway into database management. The graphical interface demystifies complex operations. It turns abstract concepts into tangible, clickable actions. This foundation makes learning advanced SQL and database design much less intimidating.
Start small. Install XAMPP, create a simple database, and import some data. Experiment with making queries and exporting your work. This hands-on practice is the only way to build real confidence. These tools exist to serve your creativity, so use them to build something amazing. or your convenience, we have prepared a clear step-by-step checklist covering installation, localization, database operations, and troubleshooting. Download the checklist at the end of this article and use it as a quick reference whenever you work with localhost tools phpmyadmin.

Sources
- Research (2023, McKinsey & Company). Unleashing developer productivity with generative AI.
- Research (2025, SAP Community). Datasphere – Graphical vs SQL Views.
- Research (2005, American Institute of CPAs). Solve The Problem Of Incomplete Uninstalls.
- Quote (Bjarne Stroustrup, 2025, Bjarne Stroustrup’s website). Bjarne Stroustrup Quotes.
- Quote (Chris Dale, 2025, Solutions Review). World Backup Day Quotes from Experts for 2025.